
Please note
If your system uses cataloguing permissions, it is possible the message below appears in case you are not permitted to add, modify or delete records.
See the relevant help section of AFO 651 for more information.
For users with access to multiple databases the AFO 611 permission to access AFO 111 must be set for each database to be able to access all functions within AFO 111.
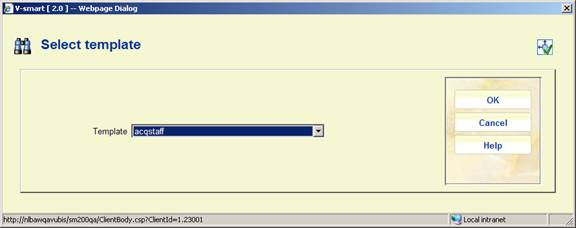
To create a new bibliographic record click the button. The New record dialog box is displayed:

· Select the Database that you want to add the new record to from the drop-down list. This will usually be Bibliographic database.
· Select the Template you want to use to create the new record from the drop-down list. Templates are created and maintained in AFO 153.
· Uncheck the box if you do not want the record to be Visible in WebOpac
· Select a publication type. The most usual is Monograph [type 1].
· Click .
Each record will be given a unique number in the database. This record number is displayed in the information bar on many screens.
If you select the correct template the Record editor window is displayed:
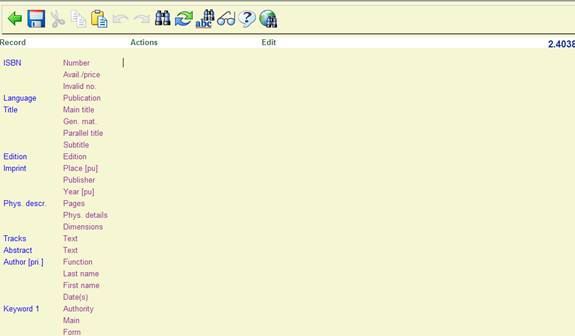
You can enter data by moving the cursor to the appropriate subfields, if these are displayed for your template, and typing in the information.
· Enter data in the appropriate subfields. You can overtype indicators and subfield codes.
· You can add tags and subfields if they are not already displayed.
· Leave tags empty if there is no data to enter. The system will remove the empty tags when the record is saved.
· Click the icon to save the new record to the database.
· Use the mouse, or the Up, Down, Left and Right arrows keys to move the cursor anywhere in the window.
· Use the End and Home keys to move to the end or beginning of a tag.
· Use Tab to move from tag to indicators and from indicators to subfield.
· You can use standard Windows features such as Cut, Copy and Paste.
· Use the Undo feature to undo the last action.
The bibliographic record can have several fields that are controlled by authority records. An example is the Personal name field.
You can search for an authority record in the Record editor, and either insert it in the field, or replace the existing data with another authority. Place the cursor in the correct field; click the Search for icon on the toolbar or select Record - Search for… (F11 function key). If the relevant parameter in AFO 651 has been set, you can enter a search string in the field. This will then become the search string for an F11 search.
You can use the button to help you enter data.This is particularly useful for the Leader field and the Fixed field tags such as the 008 tag but can be used for any tag.
· Move the cursor to the correct field.
· Click the icon on the toolbar.
- The system displays a dialog window with the appropriate subfields for the field.
· Select a code from the drop-down box or enter data in the subfields as appropriate.
· Click .
- The system inserts the data into the tag in the Record editor window.
When you have completed the data entry for the record you can save the record to the database. The system will check against the format defined in the Data Dictionary for the order of fields and to see if there are any errors according to the rules defined for the format.
Instead of saving the record you can also use the Save as template option.
· From the Record menu select the Save as template… option.
- The Save as template dialog box is displayed.
· Enter a name for the template in the Name template text box
· Check the Include data check box if you want the template to have data such as text in the fields, as well as the tags or labels
· Select Public or Private for the Type of template
- public - everybody in your library can work with the template
-
private - you can create and change the template for your own use.
· Enter free text in the Comments box
· Click
- The system saves the record as a template.
You can use the button to enrich a record opened in the record editor via a Z39.50 search.
· click this button
· select a search profile from the dropdown list
· from the search result screen, select a record to combine with the record currently being edited
The search profile must be an "update" type profile that specifies exactly which fields from the record open in the editor will be used for the Z39.50 search, so the search key can be created automatically.
The profile is defined in 651 -> Server parameters -> Z39.50 -> Z39.50 client : target profiels -> toolbar button "Cataloguing profiles".
When you decide to merge the incoming record with the existing record, you must select an appropriate merge profiel (as defined in AFO 115 – Merging profiles).
To insert special characters, you have several options:
· Cut-and-paste from Windows character map (for incidental insertion of a diacritic)
· You can install various keyboards under Windows. Then you can switch the keyboard for diacritics.
· By use of external tool (it would be the library's responsibility to buy and maintain such a tool)
Back to the technical overview screen of the record:
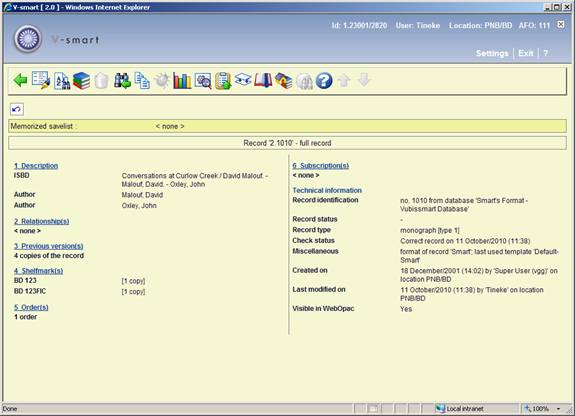
This initially displays summary information in various groups.
Technical information:
This group displays information about when the record was added and modified, and by whom. The only field you can edit directly is the Record status field. You can also change the template of the record.
|
Record identification |
This shows the internal system number and the name of the database. |
|
Record status |
This displays the current status of the record, the user who set the status, and the date and time. Options for status are: No special status, Incomplete record, Complete record, Provisional record, Approved record. |
|
Record type |
This indicates the type of record, such as monograph or serial. |
|
Check status |
Whenever you save a record the system checks the record for errors against the defined format, such as MARC21. Correct status indicates the record has been saved with no errors. Incorrect status means the record has been saved with errors. The system shows the last time the record was saved. If the record was loaded through the bibliographic loader then this field displays Record not checked. |
|
Miscellaneous |
Displays miscellaneous record information, such as the format and last template applied to the record. |
|
Created on |
System assigned |
|
Last modified on |
System assigned. |
All lines preceded by a line number can be selected by clicking on them. By clicking on line 1 you return to the bibliographic record. These groups are discussed in section 111.4.3.
: Use this option for minor modifications to the bibliographic record. See section 111.4.2.5.
: Use this option to launch so-called "related searches" for a record. See section 111.4.2.6.
: with this option you can add, modify or delete items. See section 111.5.
: Delete the record. This is only possible when no items and shelfmarks or shelfmark sets, nor orders and/or subscriptions are linked to the record.
If the parameter Delete bib record containg shelfmark(s) with no holdings in AFO 469 – Miscellaneous is ON, then you will be able to delete a record that still has shelfmark information (but no items, shelfmark sets, orders and/or subscriptions).
: to leave the record and return to the search screen. You can then either start a new search or go back to the main menu. When you return to the search screen, the last search term you entered will be retained and you can modify it to adjust your search.
Note
This only works if you have a default setting defined for the initial search screen. E.g. you have entered “star trek” as search string and checked the ‘Save settings' box. Every time you access an AFO with a bibiographic search form, this search term will appear. Enter another search term, e.g. “christie”. If you select a record from the result list and then use the option, the search form will still contain the string “christie”. You can now change this to e.g. “agatha christie” and perform a new search. When you leave the record in another way or when you leave the AFO, the search form will revert to the original search string (“star trek” in our example).
: Copy the bibliographic data of the record to another record. See section 111.4.2.1.
: Show information on errors in the MARC record (only available if there are errors). See section 111.4.2.2.
: statistics about this record. See the help on AFO 117 for more information on this subject.
: to add certain statuses to the record. See section 111.4.2.3.
: to copy the record to a (new or existing) savelist.
: see the help on AFO's 114 and 115 for more information on merging records.
: to memorise the record and subsequently merge it with another record.
: To optionally specify any ‘logical' locations and/or material types to be used by the restrictions and partial indexes. See section 111.4.2.4.
: this option is not in use (and will always be inactive).
When your initial search resulted in more than one record and you selected a record from the result list, you can use the and options to browse through the results on a record by record basis (instead of having to go back to the result list to select another record).
: Copy the bibliographic data of the record to another record. After choosing this option an input screen is displayed:
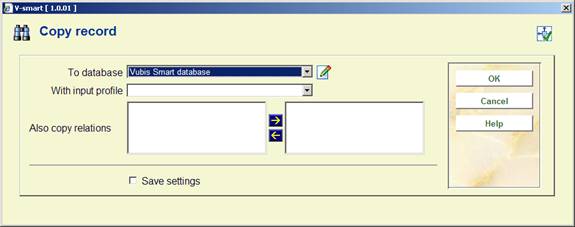
To database: choose the correct database from the dropdown list.
With input profile: choose the correct profile from the dropdown list.
Also copy relations: optionally specify which relations must be copied.
the system will ask for confirmation:

After clicking the system will create a new record. Which data from the current record is copied depends on the chosen profile. These profiles are defined in AFO 133.
Note
Sometimes Z3950 is used to retrieve records with the final purpose to copy them to the local database. If the record has relations to other records, they can also be automatically retrieved and loaded, through the use of LNK fields in conversion profiles.
When the records are retrieved with a Z3950 search, an import conversion profile should be used in which the relations that should be retrieved in case of a copy are stored in LNK fields, very similar to how this is done for the standard loader.
The only difference with the standard loader LNK fields is that the $c does not contain the name of a local matching profile, but the name of a Z3950 update profile, while the $d subfield holds the key for the Z3950 search.
For the definition of Z3950 update profiles see:
AFO651 -> Z3950 -> Z3950 Client: Target profiles -> Cataloguing profiles button.
For the definition of Z3950 import profiles see:
AFO651 -> Z3950 -> Z3950 Client: Databases and Database Groups -> select database.
The record should be copied using an import profile without conversion. The user can indicate if relations should be copied as well – in that case, when the record is copied the system will try to retrieve and load the related records with the information in the LNK fields. This is done by using the data harvester logic - no additional setup is required.
When saving a record the system performs a number of checks. Some errors will prevent you from saving the record. Others can be ignored and you can save the record anyway.
: Show information on errors in the bibliographic record (only available if there are errors). After choosing this option an overview screen with the error(s) will be presented:
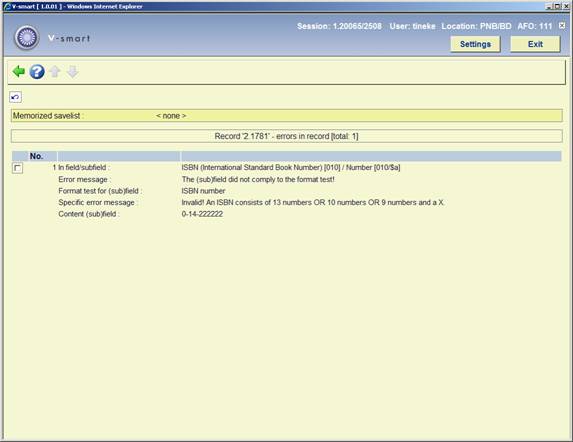
This screen is for information purposes only. To correct the error you will have to return to the bibliographic record.
: to add certain statuses to the record. After choosing this option an input screen is displayed:

Record status: Select a record status. For example, you can give all new records the status “provisional” until somebody else checks the record and changes the status to “approved”. With the SSP module you can generate reports of records with a certain status. When creating a template you can specify that all fields, also the empty ones, must be redisplayed when modifying the record.
Template: Choose a template form the dropdown list. When creating a template you can specify that for a certain record status this template must be applied when modifying the record.
Choose publication type: Choose the correct publication type. This can only be changed as long as no shelfmarks have been defined for the record.
Note
Depending on the publication type chosen, the system will behave differently when adding shelfmarks and item data. See section 111.6.
Visible in WebOpac: Uncheck this option if you do not want the record to be visible in the WebOpac.
There is a separate restriction index on WebOpac visibility. This flag works as a search restriction that is selectable in the staff module, but automatic in the WebOpac. In the WebOpac the use of the restriction is configurable by search profile. That way public profiles can skip records that are not meant to be visible, while staff profiles can still include those records in the search results.
: To optionally specify any ‘logical' locations and/or material types to be used by the restrictions and partial indexes.
For search restrictions as well as for partial indexing, the system uses extensively the data elements institution/location and material type. These data elements are both attached to “physical” holdings as defined in a shelfmark. The system provides the further ability to add institution/locations and/or material types to individual bibliographic records. This information will then be taken into account for both restrictions and partial index searching. You can add “logical” locations and material types to a bibliographic record by using this option. An input screen will be displayed:

Select any location(s) and/or material type(s) by moving them to the right hand side. These settings are used on top of defined shelfmarks.
: Use this option for minor modifications to the bibliographic record. This is done via a simple template that only displays labels and data entry fields for its subfields. Indicators are hidden.
This feature is typically useful for non-cataloguing staff (e.g. acquisitions department) who need to add their own specific information to the record without knowledge of the bibliographic format or other technical details - the data entry form only contains the fields that they need.
In AFO 153 one or more templates may be defined for this purpose.
If multiple templates have been defined, a selection form will be displayed after choosing this option:
After selecting a template (or immediately after choosing this option in case of only one template) the simple input form will be displayed:

Staff can only add or modify data in the defined fields. No new (sub)fields can be added.
If a subfield is linked to an authority list, the field on the form is a dropdown list instead of a text box.
It is possible to launch so-called "related searches" for a record in AFO 111. A list of searches will be proposed, based upon the record contents. Setup parameters determine which indexes are included in the list. If
then the search will be proposed as an entry in the list.
For authority controlled fields a link to the related authority is proposed.
In AFO 651 - Settings for related search you can specify the fields/subfields that you want to use for the index searches, as well as the default namespace for the execution of the related searches.
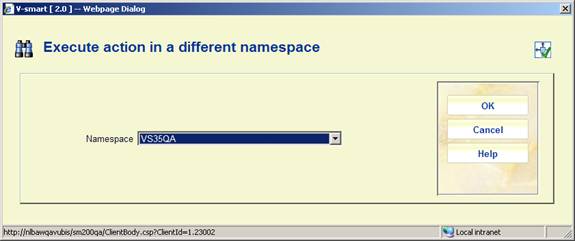
It is possible to do the related search in another namespace (which can be useful when for instance a potentials database is part of another namespace than the production database).
Finally, when the related search is done, it is possible to see the record details of the results (but no editing of the records is possible here), and you can also obtain statistics about the records that were found, grouped by record status, record type and year of publication.
When you select the option a list of related searches is shown:

: This option allows you to execute the related search in a different namespace. A selection form will be displayed:
: Select a search key and then this option to view the related results. A summary screen will be displayed:

: Select a title and then this option to view the details. The record will be opened in "read-only" mode.
: This general option gives statistics about the number of records by record status, record type and year of publication:

The technical overview screen is divided into various blocks containing one or more lines. Each block is preceded by a line number. You can access these blocks by:
· clicking on the top line of the block
· entering the line number and pressing <enter>
By clicking on line 1 you can open the bibliographic record in the editor window:

Optionally you can display information between the toolbar and the menu in the record editor. This header may contain anything the library likes to display (as long as it fits).and depends on settings in AFO 151 – Format – details of a format – Element/group Profiles. The system will first look for a (site-specific) group/element with id "!EditorTitle". If that is not present the !TitleProper group/element will be used.
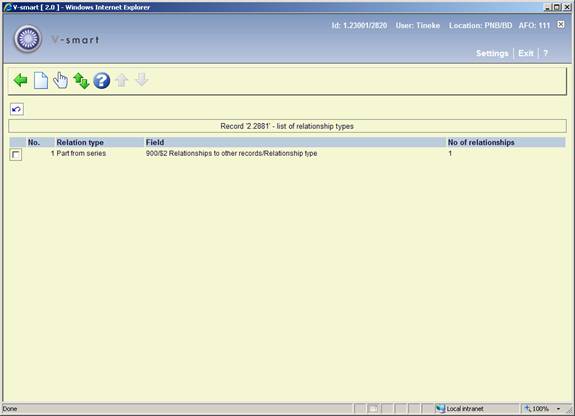
If there are relationships with other bibliographic records (e.g. part of a series, with series title) this will be shown here.
When modifying a bibliographic record, previous versions can be retained. If this happens and, if yes, how many copies will be retained; is defined by a parameter in AFO 151 – Data dictionary for records – Databases.
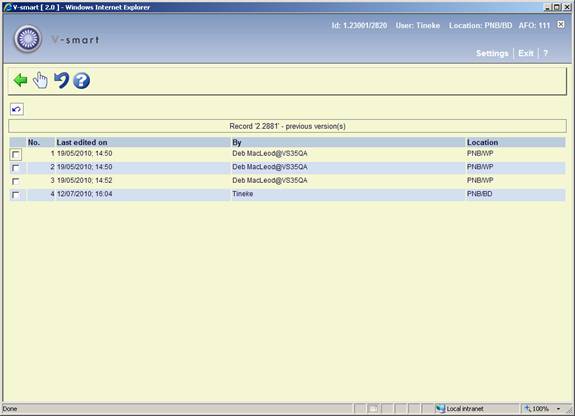
From this screen you can look at details of earlier versions and optionally reinstate an earlier version.
Displays a list of the linked shelfmarks, possibly supplemented by the number of items for each shelfmark. See section 111.5.
In case the acquisitions module is used, information related to orders for this title can be found here. See the help on the acquisitions module for details.
In case the serials module is used, information related to subscriptions for this title can be found here. See the help on the serials module for details.
There are two ways to add shelfmarks and item data to a bibliographic record.
This uses the icon on the overview screen.
1. Search for a title in AFO 111.
2. Choose the icon on the technical overview screen.
3. The system will display a screen (with all items already linked to this record).
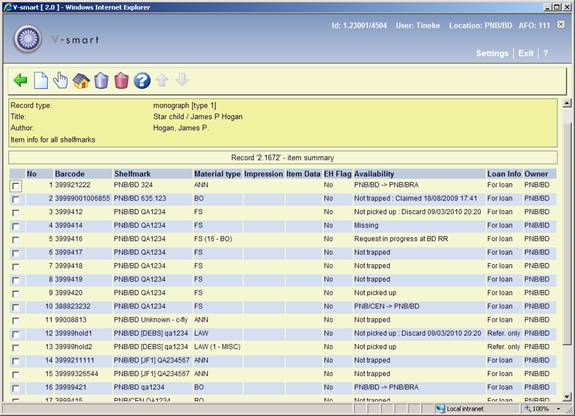
Barcode: the item barcode (this can be a negative number in case a dummy barcode was created for a reservation on an on-order title).
Shelfmark: (current) including institution, location, sublocation, shelfmark prefix, classification, cutter, shelfmark, shelfmark suffix and barcode.
Material type: the material type for each item.
Impression: optional listing of imprint details.
Item Data: optional free text field.
EH Flag: Yes or No – to denote whether or not tag 856 details exist for this item
Availability: whether the item is in the library or the due date (or any special status).
Loan info: whether or not the item is for loan.
Owner: the owning institution/location of the item. This may be different from the shelfmark institution/location when the item is at a different managing location.
: to add an item. See section 111.5.1.1.
: select an item and then this option to modify its details – the system will show the Item Detail screen.
: to display items of another institution/location (the system can be configured in such a way that only the items of the current institution/location are shown initially).
: select an item and then this option to delete it.
: Use this options to delete all items in a single action.
: to add an item. After choosing this option an input form will be displayed. The details shown on this screen are dependant on parameter settings in AFO 469 – Item Management Parameters –Data to be entered.
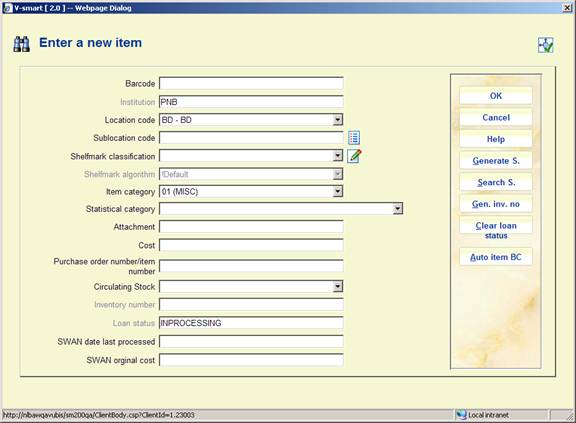
Barcode and at least one of Sublocation code or Shelfmark classification are mandatory. You must choose the correct Item category from the dropdown list. Entering data in the other fields is optional. The field Purchase order number is filled automatically by the system if there is an order linked to this record.
When a custom barcode format has been defined in AFO 651 – Custom barcodes for automatic barcode generation, you can use the button . In that case the system will redisplay the form with the automatically assigned barcode:

When adding a new item you can place a [ (square bracket) in front of the barcode number. This ensures the new item will not be counted as “new” for SDI.
This only applies to entering the original barcode, for any subsequent barcodes for the same item a [ will be stored as data (if it passes an edit check).
For SSP such a barcode would also still be counted as a “new” entry.
So if you have ordered a new copy of an existing title (to replace lost or damaged copies) and you want to suppress these from being processed as new titles for SDI, (they are not new titles) then add the new copies with the [barcode - SDI will not see these new items as new titles now available.
Your system administrator may have set a Default shelfmark algorithm in AFO 469. If this is the case, the system will default the shelfmark based on the Default shelfmark algorithm. To generate a shelfmark using the shelfmark algorithm click on the button. A summary screen with shelfmark algorithms is displayed from which you can choose the correct one. You can also use the button. This will result in a summary screen with existing shelfmarks from which you can choose the correct one. You can modify the default data entered in this way.
The Inventory number field on these forms is protected (you are not allowed to enter data into this field directly). You must use the button to generate an inventory number, an input form will be displayed:
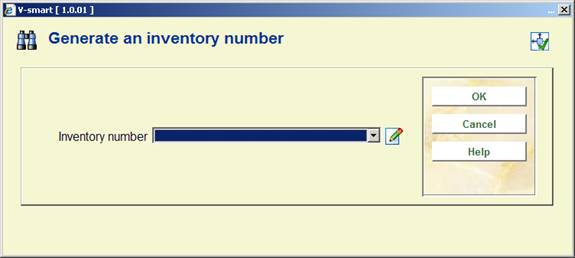
Inventory number – dropdown list of inventory number range codes as defined in AFO 469 – Inventory number ranges. You can choose an entry from the list, type in a free text number or leave the field empty. If the entry is from the list, the system generates the next number in the selected range. If the entry is not a code or is a duplicate (already found in the index), the system will display a warning.
You can optionally add a note when adding an inventory number. When entering in a new inventory number, add ‘.-‘ (period minus sign) followed by the note. This will generate the next inventory number and add the note field to the end of the generated number.
When you click on this form, the system returns to the add/update form with the new inventory number.
The Loan status field on these forms is protected (it contains the default status as defined in AFO 469 – Miscellaneous). You must use the button if you want to clear this status.
Please note
The , and buttons will only appear if the respective fields are defined in AFO 469 – Data to be entered, Data to be corrected.
After clicking on the Enter a new item form, the overview screen of the item will be displayed:

The top half of the screen contains all kinds of information about the item. This information is generated by the system and cannot be changed (protected field). The information in the bottom half of the screen can (in certain cases) be modified.
Title: the item's title.
Shelfmark: the shelfmark for the item displayed in the form [Institution] Location [Sublocation] Shelfmark.
Date added: the date on which the item was added to the catalogue.
Date updated: the date on which the item data was last modified.
Owner: the code for the Location Manager that owns the item.
Manager: - the code for the that is currently managing the item
Note
For example, if the item has been sent to another branch to satisfy a reservation, that branch's Location Manager code will be shown here.
Status: the item's status. V-smart uses the following statuses:
· In the library
· Out on loan - the due date will be displayed in the Due date field.
· Reservation available for pickup - the item is awaiting pickup at the Manager location.
· In transit from Institution/Location to Institution/Location - the item is on its way from the first location to the second location.
· Being transferred from Institution/Location to Institution/Location - the item is due to move from the first location to the second location but has not left the first library yet.
· Reservation - not trapped - the item is on the library shelf but has not been trapped for the reservation. If the reservation is on the shelf and not trapped it will also be on a Picklist.
Note
In addition to the statuses assigned by the system, you can also assign a variety of items to an item, for example: 'missing', 'at binder's', 'to cataloguing department', 'temporarily removed from collection', 'to repair department', et cetera. The status can be assigned using AFO 462 and AFO 463.
Last loan: shows the date on which the item was lent, followed by the name of the borrower and their barcode number. If the item was never checked out, this field will be empty.
Note
This information is changed as soon as the item is checked out.
Due date: the date the item is due for return if it is out on loan. If the item is not on loan, this field will be empty.
Last return: shows the date on which the item was last returned, the time and the location. This information disappears when the item is checked out again. If the item was never checked in, this field will be empty.
Note
This information is changed as soon as the item is checked out.
Previous loans: this field contains previous loans, where the borrower's name is replaced by *****. A parameter determines how many previous loans will be displayed If the item was never checked out, this field will be empty.
No. reservations: the number of current reservations. If there are no reservations, this field will be empty.
Loan history.: the following information is displayed separated by forward slashes (/):
· the total number of loans to date.
· the number of loans in the current year.
· the total number of reservations to date
from this overview screen you have the options described below. For more details on all of them, see the help for AFO 423.
Note
When there is a transaction for an item and/or you are not the owner of the item, it is not possible to modify certain item.
Select a group and click the top line. If allowed, you can make changes to the item data. See section 423.4.1.
: copy the item information to a new item record. See section 423.4.2.
: copy the item information to add multiple new item records. See section 423.4.2.
: delete the item record. This can only be done when there are no transactions and you are the owner.
: to display an overview of the various statuses assigned to the item.
: this option has no function in V-smart.
: to change the item status. See section 423.4.3.
: details of the current borrower who has the item on loan, as in AFO 431.
: used to trigger a (manual) recall notice.
: do not recall this item if automatic recall is used.
: displays total number of loans for the item, loans this year and loans in previous years.
: details of when the item was currently transferred from where and where to. See section 423.4.4.
: when the item was sent, where to and how often it was sent in the past. See section 423.4.4.
: only available if you use sublocation administration.
: This option takes you to the reservations queue as in AFO 422. Only available if there are outstanding reservations for the item.
: Use this option to 'return' one of your items that was elsewhere as floating stock. The system will update the end date of this item's collection to today's date. Standard procedures for sending back items in an overdue collection will prompt the manager location to send the item back to the owner using AFO 462/463.
: With this option you can generate a special savelist which can then be used to compare with items on the shelves (stocktaking). See the help of AFO 424 for an introduction.
This option uses the block Shelfmark(s) on the technical overview screen. After selecting this option an input screen will be displayed (if no shelfmarks have been defined) or an overview screen (if shelfmarks have already been defined).
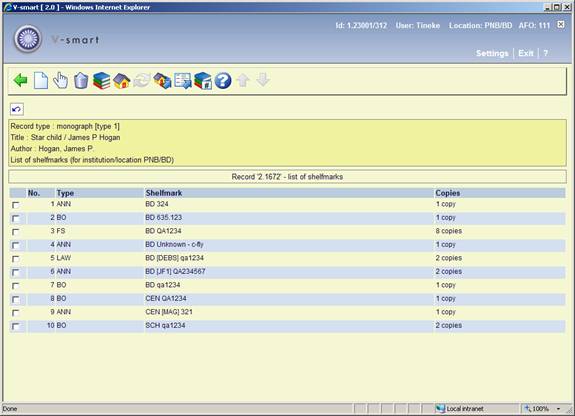
Type: the materials types of the items belonging to this shelfmark.
Shelfmark: the complete shelfmark of the items belonging to this shelfmark.
Copies: the number of copies linked to this shelfmark.
: select his option to create a new shelfmark. See section 111.5.2.1.
: select a shelfmark and then this option to modify its details.
: select a shelfmark and then this option to delete it. This can only be done when there are not items linked to the shelfmark.
:select a shelfmark and then this option to modify the material type. A dropdown list of valid material types is offered
Note
This changes the material type of ALL items linked to this shelfmark.
: to display items of another institution/location (the system can be configured in such a way that only the items of the current institution/location are shown initially).
: this option is only available in certain circumstances.
: when there are multiple shelfmarks, you can move items from one existing shelfmark to another. After choosing this option an input form is displayed:

Enter the line numbers of the shelfmark from which you are moving and the shelfmark to which you are moving the items.
Note
You will be moving ALL linked copies of that shelfmark to the new shelfmark.
: select this option to move a shelfmark and the associated items/holdings to a different bibliographic record. See section 111.5.2.2.
: use this option to change the holdings of a single-part title to a serial/multipart structure or a serial/multipart title to a single-part structure. See section 111.5.2.3.
: select his option to create a new shelfmark. After choosing this option an input form will be displayed:

At least one of Sublocation code or Shelfmark classification are mandatory. You must choose the correct Material type and Location code from the dropdown list.
After clicking the standard screen for adding items is offered. See section 111.5.1.1 for more details on how to do this.
Note
It is not mandatory to add an item. It is possible to define a shelfmark to which no item barcodes are linked.
This function allows you to move one or more shelfmark(s) (and their associated holdings) from one bibliographic record to another.
Example: Branch added a shelfmark (and items) to the wrong bibliographic record. Possibly the same title but they added an audio cassette to a book record.
After selecting this option, the system first verifies that the holdings on each of the shelfmarks can be moved. i.e. the items attached to the shelfmark(s) are not on loan, on reservations or in transit.
Next the system presents the standard bibliographic search form. Search for the record that you want to move the shelfmarks to:
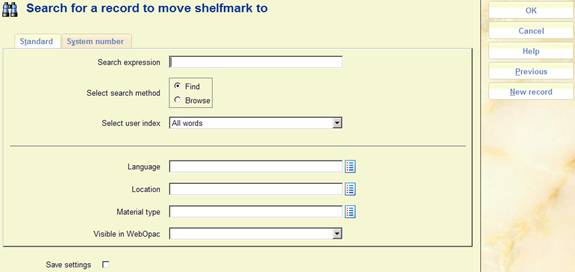
Select the option on the Full record display to indicate that this is the record that you want to move the shelfmarks to. Exit back out of the record and search form.
The system now prompts for confirmation:

After confirmation, the system returns to the original List of Shelfmarks screen and the remaining shelfmark(s) are displayed.
Note
You can only move shelfmarks to another bib record within the same database and of the same publication type.
Items belonging to a shelfmark cannot be moved when they have one of the following statuses: on loan, reserved, in transit, part of exchange collection.
This function allows you to change the holdings of a single-part title to a serial/multipart structure or a serial/multipart title to a single-part structure.
Changing single-part to a serial/multipart structure
AFO111 search for the bibliographic record and select the Shelfmark(s) group from the Full record display.

On the List of Shelfmarks screen, select the option. A selection form is displayed:

Choose type: the system lists the valid record types that the current bibliographic record can be changed to.
Each currently barcoded item represents a different volume:
If set, each barcoded item will be recreated with a volume number equal to the barcode (thus making each barcode its own distinct volume). At a later time, you can then edit the numbering of each volume and replace the barcode with the correct numbering information.
If not set, every barcoded piece represents the same volume. Only one volume record is created (with a volume equal to one “ “ (space) character) and all barcoded items will share this same numbering. At a later time, you can then edit the numbering of the volume and replace the space character with the correct numbering information.
After pressing , the system asks you to confirm your action:

The bibliographic record now contains one shelfmark set containing 4 barcodes (each with its own distinct numbering. The record type has also been changed.

To change the numbering of each volume, choose the Shelfmark(s) group from the Full record screen. Select the shelfmark and when the Holdings statement for shelfmark sets screen displays, choose the option. When the Issue summary screen displays, you can use the option to change the numbering of the volume.
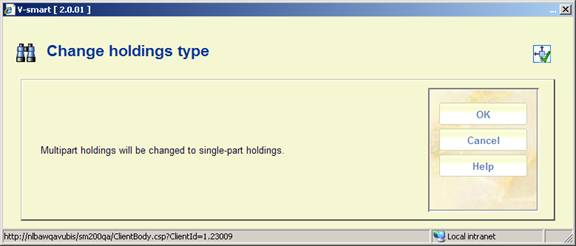
Changing Serial/multipart title to a single-part structure
AFO111 search for the bibliographic record and select the Shelfmark(s) group from the Full record display.

On the List of Shelfmarks screen, select the Change holdings type option. A selection form is displayed:
After pressing , the system asks you to confirm your action:
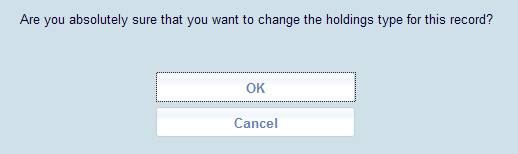
Note
If you answer , the system will delete any subscription, shelfmark set, volume information, etc. associated with this title.
If you answer , the bibliographic record now contains one shelfmark containing 4 barcodes. The record type has also been changed.

V-smart supports the following publication types:
|
Type |
Description |
Remarks |
|
1 |
Monograph |
Monographic publications that consist of one physical volume |
|
2 |
Multi volume (fixed number, with item data) |
The following items are considered limited multiple volume works: any publication that consists of a number of separate individual parts which are published as a unit. That is: a publication that is designed to appear in a specific number of volumes and will eventually be complete. Example: most encyclopaedias. |
|
3 |
Multi volume (ongoing, without item data) |
a group of publications that are linked to one another by the fact that each publication carries the name of the group as a whole in addition to its own individual title. A series consists of a publication designed to be issued as an unlimited number of separate volumes. The series may be numbered or not. |
|
4 |
Serial |
a publication that is published, in printed form or not, in sequential issues or parts, normally arranged in a numerical or chronological sequence, and intended to continue indefinitely. Serial publications include: all periodical publications such as magazines, newspapers, yearbooks, address books and series or reports that appear with less regularity, and records of institutions, and congressional debates. |
|
5 |
Multi volume (fixed number, without item data) |
the description of the "main or header"-title of a limited multiple volume work whose separate parts have significant titles. |
|
6 |
Analytical |
Descriptions of publications (‘component parts') which require a reference to a host document in their bibliographic identification; analytical descriptions include: articles from magazines, chapters from books, stories taken from collections, musical performances taken from collections, etc. Analytical descriptions are entered as type “6” and can then be linked to other types of publications using hierarchical relations (the ‘host document'). |
Examples
· Type 1: Monograph
Single-volume monographs are: monographic publications that consist of one physical volume. In Vubis they are entered as Type 1 descriptions.
Example
The Assault / Harry Mulisch
The Name of the Rose / Umberto Eco
· Type 2: Multi volume (fixed number, with item data)
Multiple volume monographs are limited multiple volume works with non-significant volume titles. Limited multiple volume works are any publication that consists of a number of individual separate parts that are published as one unit, i.e. any publication that is designed to be published in a specific number of volumes and that will eventually be complete (e.g. most encyclopaedias).
Example:
Winkler Prins Encyclopedia (22 volumes.)
Colliers Encyclopedia (24 volumes.)
Given that the volume titles are not significant, no separate descriptions are created for them. The volume titles may still be included in the bibliographic or analytical annotation.
Example:
Annotation: Volumes 1‑5: Works. - Volumes 6: Register. - Volumes 7‑9: Systematic survey
Annotation: Volume 1: Alphabetical list. - Volume 2: Systematic list
· Type 3: Multi volume (ongoing, without item data)
A series is a group of publications linked to one another by the fact that, in addition to its individual title, each publication bears the main title that applies to the entire group. A series consists of an unlimited number of separate publications depending on the design. The series may or may not be numbered.
Example:
Lecture Notes in Economics and Mathematical Systems [= series ] 184 : Assignment and Matching Problems : Solution Methods with FORTRAN Programs / Rainer E. Burkard and Ulrich Derigs [= Type 1]
Social Law Series [= series ] no 15: Principles of social security for workers / J. The Cock ... [et al.] [= Type 1]
Select Type 3 if the titles for the separate volumes are significant; select Type 4 if this is not the case.
Typical examples of Type 3 are series of monographs. The descriptions entered as Type 3 are the descriptions for the series: the data you enter as part of the series descriptions must apply for all monographs in the series.
The descriptions of monographs in the series are entered as Type 1 (single-volume monographs) or, if applicable, as Type 2 (multi volume monographs) or 5 (”
The descriptions for the series and for a monograph within that series are thus entered separately and then linked using a hierarchical relation.
· Type 4: Serial
Serial publications are publications published in sequential units, whether printed or not, normally arranged in a numeric or chronological sequence and intended to be published indefinitely. Serial publications include: all publications that appear periodically, such as magazines, newspapers, yearbooks, address books (etc.) and series of reports that appear less regularly, as well as institutional debates and congressional records.
Example:
Wall Street Journal
Journal of the American Medical Association
BNTL
Serial publications are entered as Type 4. However, select Type 3 if the titles of the separate volumes are significant (in other words, monograph series are almost never considered as serial publications and are entered as Type 3).
· Type 5: Multi volume (fixed number, without item data)
“
Example:
The Path to Freedom / Jean-Paul Sartre [= “
Collected music essays / S. Vestdijk [= “
Volume 1: The first and the last [= Type 1]
Volume 2: Euterpe's Crack Regiments [= Type 1]
Volume 3: Grandmother's cupboard [= Type 1]
If the volumes have non-significant titles, the work is entered as Type 2 (multi volume monographs), except if the parts of have different subject indexing and/or different author records (type 5).
”
Note
Depending on the publication type chosen, the system will behave differently when adding shelfmarks and item data. In other areas (for instance Reservations) the system also will behave differently depending on publication type.
In the next paragraphs the behaviour of each publication type is discussed briefly.
When you choose type 4 it is not possible to use the option to add items. The option is not available here:
Later, when items have been added to the volume, additional items can be added via this screen.
You can however add a shelfmark in the usual way (see section 111.5.2). Next the system will not show the usual add item screen, but a screen like the one below:

Description – this field is protected and contains the type of holding description.
System generated holdings – this field is protected and, if the Automatically generate flag is set, displays the holdings statement generated by the system.
Retrospective statement – enter a retrospective note summarising what you already hold for this subscription. Enter a carriage return to force a new line within the retrospective statement. This field is optional.
Automatically generate – if checked, the system will automatically build a holdings statement when issues are received, moved to a new location, etc.
Follow up statement - enter a follow up note. Enter a carriage return to force a new line within the follow up statement. This field is optional.
Use for compressed WebOpac display: If you wish to show a retrospective (and/or followup statement) when holdings statements are compressed, you must choose which shelfmark set contains the retrospective statement that you wish to display. You can only set the flag on one shelfmark set for each type of holding (i.e select one shelfmark set for Vols and select a different one for Issues). If you already have the flag set in one shelfmark set and then update the flag in another set (for the same type of holding), the system automatically turns off the flag in the original shelfmark set.
If you are not recording receipts or entering barcodes for this title, you may choose to just enter a statement into the Retrospective statement field and press . The system will display the contents of the Retrospective statement and Follow up statement fields in the WebOpac.

If you are recording receipts or entering barcodes for this title, you may want to turn on the Automatically generate flag so the system will automatically update the holdings statement whenever issues are received.
When the system displays a summary holdings statement it formats it to include the contents of the Retrospective statement field, the System generated holdings field and the Follow up statement field. Each field begins on a new line.
Next the system displays the Holdings statement for shelfmark sets screen:

One numbered line displays for each shelfmark set consisting of Shelfmark, Format, Type, OPAC label and Holdings statement.
Shelfmark – displays the shelfmark including the copy number from the shelfmark set.
Format – displays the physical format assigned in the .
Type – displays the Description field from the type of holding record.
OPAC label – displays the OPAC label field out of the type of holding record.
Holdings statement – multiple line display of holdings information for this shelfmark set. This holdings statement displays to WebOpac users.
Compressed – indicates whether or not the Use for compressed WebOpac display flag has been set.
[I] – create a new set for the current shelfmark. The system prompts you to fill in a Holdings statement form. If your system has the Use fixed type of holding in Holdings management turned on in AFO 469 – Multipart/serials defaults, please refer to section 111.6.1.1. If this option is turned off, please refer to section 111.6.1.2.
[*] – select one of the shelfmark sets and choose this icon to update the holdings statement. If your system has the Use fixed type of holding in Holdings management turned on in AFO 469 – Multipart/serials defaults and if the selected shelfmark set has only one type of holding, the system displays the Holdings statement form. Otherwise, you are first asked to select a type of holding from the title's valid list and then the system displays the Holdings statement form. Please refer to section 111.6.1.1 for more details on the Holdings statement form.
[S*] – select one of the shelfmark sets and choose this icon to delete the shelfmark set. If there are receipts or barcodes attached to this shelfmark set, you are not allowed to delete it. You must choose the icon, go to the Receipt information screen and delete receipts and barcodes. When you return from deleting the receipt information, you will be allowed to delete the shelfmark set.
[H*] - select one of the shelfmark sets and choose this icon to add a new type of holding to an existing shelfmark set. This option is turned off if your system has the Use fixed type of holding in Holdings management turned on in AFO 469 – Multipart/serials defaults.
[G*] - select one of the shelfmark sets and choose this icon to update information about the shelfmark set. This information includes copy number, shelving information as well as retention, binding and discard information. Please refer to section 111.6.1.3.
[M*] select one of the shelfmark sets and choose this icon to update MARC holdings information about the shelfmark set. This information includes notes. Please refer to section 111.6.1.4.
[R*] - select one of the shelfmark sets and choose this icon to display or delete receipt information. Please refer to section 321.3.4.
[V] – use this option to receive and barcode issues for the current shelfmark. Please refer to section 111.6.1.5.
[T*] – select one of the shelfmark sets and choose this icon to change the OPAC label for the selected type of holding or to toggle the Compress holdings flag. If there is more than one type of holding for the selected shelfmark set, you are first asked to select a type of holding from the shelfmark's valid list and then the system displays the Update type of holdings form. Please refer to section 321.4.2.
If the title is a multi-volume or serial that you are intending to receive through one or more subscription(s), do NOT use this option. Any records created using this option will not be available when you add your subscription(s). If the title is for a multi-volume or serial that you are not going to be receiving through Serials control, you can use this option.
If you have the Use fixed type of holding in Holdings management turned ON in AFO 469 – Multipart/serials defaults, you will be presented with this screen when you choose the icon from the Holdings statement for shelfmark sets screen:

The option will be inactive in this case.
If you have the Use fixed type of holding in Holdings management turned OFF in AFO 469 – Multipart/serials defaults, you will be presented with this screen when you choose the or icons from the Holdings statement for shelfmark sets screen.
The fields on this form are divided into three sections by a _________ line.
Section 1 – allows you to link to a type of holding/publication pattern that already exists on this title:
Choose from an existing Type of holding – this is a dropdown list that contains all of the type of holdings already attached to this title. Check to see if another staff member has already entered the publication pattern information you want. If so, select that entry and proceed to section 3 of this form.
Section 2 – allows you to add a new type of holding/publication pattern to the current title. When you are finished, the new type of holding/publication pattern will be linked to the current shelfmark set and can be used by other staff members when they create other shelfmark sets for this title.
OR
Create a new record: - enter a unique description for the type of holding. The description cannot have been used to describe any other type of holding records on this title.
Type – select one of the three options: issue, index or supplement.
OPAC label – enter the label that displays in the WebOpac for this type of holding.
Choose a pattern template – select a previously defined pattern from the dropdown list of templates. This will give you a set of captions for numbering and chronology, applicable to a specific type of publication (daily, monthly, quarterly, etc.).
or define your own captions – alternatively you can define your own captions for numbering and chronology, specific to the publication you are adding.
Section 3 – allows you to enter information that controls the holdings statement that is produced for this type of holding/publication pattern on this shelfmark set. When creating a summary holdings statement, the system will first display the Retrospective statement, then, if the Automatically generate statement flag is set, display the System generated holdings and then display the Follow up statement. See above for more information on the Use for compressed WebOpac display field.
Press to return to the Holdings statement for shelfmark sets screen.
Select one of the shelfmark sets from the Holdings statements for shelfmark sets screen and choose the icon to update information about the shelfmark set. This information includes copy number, shelving information as well as retention, binding and discard information. The following input form is displayed:

Shelfmark – display only. The location of the current shelfmark set.
Copy number – assign a copy number to this set if you have more than one shelfmark set at the current shelfmark. When the system displays the shelfmark set on other screens it will include the copy number in the Shelfmark display. For example, BD REF.123 c.1. refers to MARC21 – 852 $t, UNIMARC – 200 $n.
Shelving scheme – refer to the appropriate MARC holdings standard for valid entries. MARC21 – 852/*1, UNIMARC – 200/*1 (*1 indicates first indicator).
Shelving order – refer to the appropriate MARC holdings standard for valid entries. MARC21 – 852/*2, UNIMARC – 200/*2 (*2 indicates second indicator).
Shelving title – enter the title that is used to shelve the item. Refers to MARC21 – 852 $l, UNIMARC – 200 $k.
Copyright article fee - .this field contains the unique identification code for component parts appearing in monographs and serials. Refers to MARC21 – 852 $s, no equivalent in UNIMARC.
General retention policy – enter the general retention policy for the bibliographic item. Refers to MARC21 – 008 position 12, UNIMARC – 102 $a position 1.
The next three fields make up the specific retention policy. A specific retention policy is defined when the library retains specific parts of the item for a limited time. For example, l1y indicates that the last year of issues is retained.
Specific retention policy type - Refers to MARC21 – 008 position 13, UNIMARC – 102 $a position 3.
Specific retention policy no. of units - Refers to MARC21 – 008 position 14, UNIMARC – 102 $a position 4.
Specific retention policy unit type – Refers to MARC21 – 008 position 15, UNIMARC – 102 $a position 5.
Binding flag – if checked, this indicates that issues in this shelfmark set are to be bound.
# to bind – if the Binding flag is checked, enter the number of issue to bind in a single volume and when binding should occur. This field is for information purposes only.
Binding color – enter the binding color.
Binding notes – enter any notes specific to the binding process.
Discard flag – if checked, issues in this shelfmark set are to be discarded.
# to discard - if the Discard flag is set, Indicate the number of issues to be discarded and when discard should occur. This field is for information purposes only.
Note
The three fields: # issues to bind, binding color and binding notes are not related to the fields set up in the Binding general form that can be accessed from a subscriptions general details screen.
Select one of the shelfmark sets from the Holdings statements for shelfmark sets screen and choose the icon to update holdings information about the shelfmark set. This information includes copy number, physical format, shelving information, retention policy and notes about the shelfmark set. The system displays the MARC edit form for the shelfmark set. The options are the same as for bibliographic editing but the editing applies to the holdings format (MARC21 or UNIMARC) defined in AFO 159 instead of the bibliographic format.

Choose the icon from the Holdings statement for shelfmark sets screen to receive and barcode issues for the currently selected shelfmark.
If the title has more than one type of holding attached and you have the Use fixed type of holding in Holdings management turned on in AFO 469 – Multipart/serials defaults, the system displays the Select type of holding form.

Description – The system displays the type of holdings already created for this title. An asterisk (*) in front of the type of holding indicates that the type of holding is already linked to one or more of the shelfmark sets at this shelfmark. Select one of the type of holdings from the dropdown list.
Save as default: you can check this option to save the value selected from the dropdown list as default. Use the button to reset the default value to 'empty'.
Press and the system displays the Issue summary screen.
The Issue summary screen displays one line for each numbered issue for the selected type of holding. The issues listed in the grid are accessible to all shelfmarks on the title. The Copies received and Copies barcoded columns reflect the status of each issue at the selected shelfmark.

Brief bibliographic data displays above the grid. This data is protected and includes the fields defined in the !Serial element/group profile record.
Below the bibliographic data is a grid containing one row for each issue defined for the selected type of holding.
Numbering – enumeration and chronology of the issue.
Copies received – number of copies of this issue received for the selected shelfmark. If the type of holding is attached to subscriptions, you may not receive issues. The copies received column is updated either by Serials check-in or by creating an item barcode. You may enter this screen and find that copies received is greater than copies barcoded. This is because received issues need not necessarily be barcoded.
Copies barcoded – number of copies of this issue barcoded for the selected shelfmark.
[I] – use this option if the issue you are receiving is not already listed. This button is disabled if the current type of holding is attached to subscriptions. If enabled, the system displays the Add/modify issue form. Please refer to section 311.3.2.3.
[*] – select one of the issues and then use this option to receive and barcode that issue for the selected shelfmark. If the issue is already received, the system will just attach a barcode. Use this option to barcode serial issues that were received within the Serials module or to receive and barcode multivolumes. Please see below under Barcoding issues.
[R*] – select one of the issues and then use this option to receive (but not barcode) that issue for the selected shelfmark. If the type of holding is attached to subscriptions, you may not receive issues. Please refer to section . Please see below under Barcoding issues .
[N*] – select one of the issues and then use this option to change the numbering for the selected issue. . Please refer section 311.3.2.3.
[M] – use this option to change the order of display issues in the grid. Please refer to section 311.3.5.
[D*] - select one of the issues and then use this option to delete the issue. The system will prompt for confimation. An issue can only be deleted if it is not linked to any shelfmark sets (i.e. has no barcoded item associated with it).
Select one of the issues from the Issue summary screen and choose the icon. The system displays the Enter a new item form.
When a custom barcode format has been defined in AFO 651 – Custom barcodes for automatic barcode generation, you can use the button . In that case the system will redisplay the form with the automatically assigned barcode:

When adding a new item you can place a [ (square bracket) in front of the barcode number. This ensures the new item will not be counted as “new” for SDI.
This only applies to entering the original barcode, for any subsequent barcodes for the same item a [ will be stored as data (if it passes an edit check).
For SSP such a barcode would also still be counted as a “new” entry.
So if you have ordered a new copy of an existing title (to replace lost or damaged copies) and you want to suppress these from being processed as new titles for SDI, (they are not new titles) then add the new copies with the [barcode - SDI will not see these new items as new titles now available.
Shelfmark set – this field contains a dropdown list of shelfmark sets (for the current shelfmark) that you can attach this barcode to. For each shelfmark set in the list, the system displays a number (starting at 1 for unique identification purposes) followed by copy number (from the Shelfmark set general form), binding status (i.e. no binding versus binding copy) and receipt status (i.e. not received versus received). The system also includes one entry that is blank. Use this entry to start a new shelfmark set.
For example,
Select 1 if you are barcoding an issue already received in Serials.
Select 2 to receive and barcode the issue that belongs to the binding copy shelfmark set.
Select 3 to receive and barcode the issue for a completely new shelfmark set for the current shelfmark.
The Inventory number field on these forms is protected (you are not allowed to enter data into this field directly). You must use the button to generate an inventory number, an input form will be displayed:
Inventory number – dropdown list of inventory number range codes as defined in AFO 469 – Inventory number ranges. You can choose an entry from the list, type in a free text number or leave the field empty. If the entry is from the list, the system generates the next number in the selected range. If the entry is not a code or is a duplicate (already found in the index), the system will display a warning.
You can optionally add a note when adding an inventory number. When entering in a new inventory number, add ‘.-‘ (period minus sign) followed by the note. This will generate the next inventory number and add the note field to the end of the generated number.
The Loan status field on these forms is protected (it contains the default status as defined in AFO 469 – Miscellaneous). You must use the button if you want to clear this status.
Please note
The and buttons will only appear if the respective fields are defined in AFO 469 – Data to be entered, Data to be corrected.
After entering the barcode, select the correct shelfmark set, item category, etc and press to create the barcode. If the issue was not previously received, it will now display as both received and barcoded. The system returns to the Issue summary screen.
Select one of the issues from the Issue summary screen and choose the icon to receive (but not barcode) the issue. The system displays the Receive issue form.

Numbering – enumeration and chronology of the issue. Not updateable.
Copies to receive – enter the number of copies of the issue that you are receiving for the current shelfmark.
Shelfmark sets – select which shelfmark sets you want to receive for. The list contains the shelfmark sets for the current shelfmark that have not received this specific issue (i.e. v.3). If a shelfmark set is controlled by a subscription, it does not get included in the list. A blank entry is also included in the list to allow you to receive the issue for a completely new shelfmark set.
For each shelfmark set in the list, the system displays a number (starting at 1 for unique identification purposes) followed by copy number (from the Shelfmark set general form) and binding status (i.e. no binding versus binding copy).
When you press the system verifies that the value in Copies to receive matches the number of shelfmark sets you selected. If no discrepancy is found, the system marks the issue as received on the selected shelfmark sets.
Once you have finished adding all information the system returns to the List of shelfmarks screen.

Type: the materials types of the items belonging to this shelfmark.
Shelfmark: the complete shelfmark of the items belonging to this shelfmark.
Sets: the number of sets linked to this shelfmark.
[I] - Select this option to add a new shelfmark. Please refer to section 111.6.1.1.
[*] - Select a shelfmark and then choose this option to update holdings information for this shelfmark. See section 111.6.1.2.
[S*] - Select a shelfmark and then choose this option to delete the shelfmark. This can only be done if there are no sets linked to the shelfmark.
[A*] - Select a shelfmark and then select this option to change the material type. Select the desired answer from the list.
Note
This changes the material type of ALL items linked to this shelfmark.
: to display items of another institution/location (the system can be configured in such a way that only the items of the current institution/location are shown initially).
: this option is only available in certain circumstances.
[W] - If you select this option, an input screen appears. In the input field From shelfmark enter the number of the line containing the shelfmark whose holdings data you wish to move. In the following input field To shelfmark, enter the number of the line containing the shelfmark to which you wish to move the holdings information.
Note
You will be moving ALL linked sets of that shelfmark to the new shelfmark. The shelfmark from which you moved the sets (to which now no sets are linked) is automatically deleted.
Select the icon from the Full record screen. The system displays the Item summary screen. Select one of the items and the system displays the Item detail entry screen. Select the Location field and the system responds by displaying the Location form.

Shelfmark set – displays a dropdown list of shelfmark sets at the current shelfmark that you can move this item to. If the item was received through Serials control, you will only see one shelfmark set in the list. For each shelfmark set in the list, the system displays a number (starting at 1 for unique identification purposes) followed by copy number (from the Shelfmark set general form), binding status (i.e. no binding versus binding copy) and receipt status (i.e. not received versus received). The system may also include one entry that is blank. Use this entry to start a new shelfmark set.
If you wish to move the item to another shelfmark on this title use either the (search shelfmark) or (add shelfmark) button depending on whether the shelfmark you are moving to already exists on the title. Regardless of which option you choose, the system redisplays the Location form with the newly selected shelfmark.

Now press to move the item to the new shelfmark.
The system behaves in the same way as with publication type 4.
When you choose type 3 it is not possible to use the option to add items. In that case the following message will be displayed:

You can however add a shelfmark in the usual way (see section 111.5.2). Next the system will not show the usual add item screen, but the holdings statement form. See section 111.6.1.1 for more information.
The system behaves in the same way as with publication type 3.
Publication type 6 records form part of analytical cataloguing. They are meant for component parts and therefor you cannot add items to type 6 records. It is possible to set up links between other record types, so you can add items to 'child' records.
See the general help on analytical cataloguing for more information including setup and examples.
Please note
This functionality is only available for Smart and UniMARC formats. It is not compatible with MARC21.
Records that have a link to one or more analytical entries, have an additional option on the overview screen, :

After selecting this option a new screen is displayed:
: Select a line and then this option to modify the entry. See the sections on adding and linking enties in the general help on analytical cataloging for more information.
: Select a line and then this option to delete the entry. The system prompts for confirmation.
: Use this option to create a new record to be linked to the master. See the general help on analytical cataloging for more information.
: Use this option to create a link with an existing record. See the general help on analytical cataloging for more information.
: This action will always delete the master record and it will delete the analytical entries as long as they don't have relations with other bibliographic records; a warning is displayed.
: Select one or more analytical entries and then this option to put them in a savelist.
Note
The option is only available for records that are created based on a template that has a link to another template for analytical cataloguing.
· Document control - Change History
|
Version |
Date |
Change description |
Author |
|
1.0 |
April 2008 |
creation |
|
|
2.0 |
August 2008 |
various updates; new option for serials holdings display; new option for WebOpac visibility |
|
|
2.1 |
January 2009 |
note for inventory number |
|
|
3.0 |
April 2009 |
new options: delete issue from summary screen, Moving shelfmarks to alternate bib, Changing holdings type, owner column in item display; updated info on: searching and on AFO 469 parameter; added type 6 records; improved info on item details, Z39.50 functions |
|
|
4.0 |
June 2010 |
New chapter on search result screen; improved bookmarks; new option to copy multiple records to another database; new automatic barcode feature; clear loan status button; possible to delete records with empty shelfmark; option to modify search term; more on restrictions, including new option; new option for related searches; new sort options, option to show title information in menu bar of record editor; option to browse through records; [ bracket for item barcode; author/title on item/shelfmark summary screens; simple template option |
|